Sunday, August 28, 2011

Mini Bunting


This is the window ledge in my kitchen over my sink.


I like a little whimsy


I also like variety.  I have a bunch of these "Mini Bunting" Strands.  I change them out according to my mood.  They are super easy and cheap and add just a little bit of fun to a room. They can be put in plants like I have done hear.  Or on the corner of a mirror or picture frame.  On a cake or any where else you imagination can come up with.

This particular strand of Mini Bunting is made from a small scrap of Toile fabric that I got from who knows where.  I cut 1 1/2" x 2" triangles with straight scissors across the top and pinking shears for the other two sides.  Then I simply sewed them together leaving plenty of thread at each end to tie them off.  I bought a pack of skewers from Wal-Mart, they cost $ .97 for a pack of 100.  So all in all this little bit of whimsy in my kitchen cost me about $ .03 figuring in the thread.  I think that could fit into any budget.


Thursday, August 25, 2011

There's A Chandelier Here Somewhere... I Can Smell It!

Earlier today Sweet Lily Girl was looking for her "blankie".  Yes, she has one of THOSE.  She calls it her "pink blankie" as if she didn't have at least 6 other pink blankets.  She was walking around starting to get a little frustrated and said "Where is my blankie? I can smell it around here somewhere!"  It cracked me up and I'm still laughing about it.  I think I might use the phrase randomly from now on.  "Where are my keys? I can smell them around here somewhere." or "There is a pen on my desk somewhere I can smell it" or "Gabe must be home I can smell him."  Well maybe not the last one. Except he does where some great cologne.  (You're welcome for that great gift I bought myself you honey!)

Here is a picture of Lily when her "Pink Blankie" was still pretty.


Doesn't it look so soft and shinny and a pretty soft pink color?  I'm not showing you a picture of it now almost 4 years later.  Those of you moms that have kids with "blankies" I'm sure you understand.  For the rest of you lets just say it's not all those previously listed things anymore and the only reason it doesn't stink is that I wash it in baking soda on a regular basis. (Thanks Brooke for the tip.)

So ANYWAY....

I've been working to get everything ready ahead of time for the girls birthday party in October and I want to make a faux chandelier.  I got everything out that might possibly be usable to inspire myself and take a picture to share with you all of course.  While I was looking at this picture I took earlier today I thought: "There is a chandelier in here somewhere....I can smell it." 


Somewhere in all of this is a chandelier just waiting to be created.  I've been inspired elsewhere too.  Check these out:


Each one is amazing, inspiring and even shares easy to follow tutorial but not exactly what is floating around in my head.  I'm hoping I can get that image out into reality.  I'll share pictures here if I can!

Saturday, August 20, 2011

Crinoline Slip "How To"

My mom has offered to make princess dresses for the two little princesses upcoming birthday party.  It's not until October, but hey I hate to be rushed and to be perfectly honest, I really, really like planning parties.  In order to make my mom's project easier I decided to make crinoline slips to go under the dresses so she didn't have to add layers of poof to the dresses themselves.

Okay so here is a basic how to for a crinoline slip for little girls.  I did not find a very good tutorial online so I had to figure it out myself.  I had some issues but it all worked out in the end.  The first one is not pretty but it will work.  The second one turned out great.  I'll tell you what I did for the second and spare you the disaster of the first.

The "second" on a very cute and suprisingly cooperative model:


Side Note:  I learned how to use the timer on my camera today.  


I happened to still have left over white fabric from my wedding 5 years ago so I used that.  You could use any light weight fabric.  A couple of weeks ago my friend Carrie gave me some spools of white tulle that she did not want anymore.  So for me the cost of this project was $0.00. Hoot, Hoot, Hooray!!! Thanks for thinking of me Carrie!  However if you do not have the supplies on hand I would estimate the cost of this project to be about $15 if you had to pay full price for everything including fabric, tulle, elastic & thread.

What you need:

*1 yrd light weight fabric
*approximately 40 yards of 6" wide tulle (you can use a spool or yardage can be cut into 6" strips)
*elastic (I used 3/4" because it's what I had on hand)
*coordinating thread


Note: I will give the measurements I used for the slip I made Ava Grace.  She wears size 2T, length can easily be added to make it longer for a larger child.  The length of the elastic for the waist band determines how big around.


First Step is to make the underskirt.  I know my girls don't like anything itchy so I didn't want the tulle to touch their skin.

Cut 2 rectangles from your fabric 32" x 12" sew the two rectangles together along the 12" sides. 


Then to create the waist, fold over and press one of the 32" sides 1/4" then 1" to create a pocket for the elastic.


Sew all the way around leaving a big enough opening for the size of your elastic to be fed through.  Note: Do not feed your elastic through until you have sewn on the rows of tulle.  I made this mistake and it is very difficult to sew the tulle onto fabric that is gathered.


Cut the bottom edge with pinking shears or turn up with a hem.  I chose to use pinking shears.

Next step is dealing with all that tulle.  I made 3 rows of poof.


Cut 6 strips approximately 230" or 19' long.  I laid a yard stick in front of myself and measured out approximately 30 inches at a time feeding the tulle through my hands.  It seems like a lot of tulle but gathering all that length makes for a nice and poofy skirt.

For the top row I used a single layer of tulle.  Sew with a baisting stitch along the length of one side about a 1/2" from the edge.  Pull the bobbin (bottom) thread to gather so that it ends up about 64" long.  Pin to the skirt about and inch below the waist band. Then sew gathered tulle to the skirt along baisting stitch.

For the 2nd row I sewed  two strips of tulle with the baisting stitch, gathered and sewed to the skirt in the same way.  Over lapping with the row above by about 2".

For the 3rd row I sewed three strips of tulle with the baisting stitch, gathered and sewed to the skirt in the same way.  Over lapping with the row above by about 2".

I have a remaining space at the bottom of the under skirt.  I did this intensionally waiting for the exact length of the skirt of the dress my mom is making.  I may need to add a 4th row or trim of a couple of inches.

The last step is to add the elastic.  The length of your elastic should go around your childs waist and over lap 1".  Put a safety pin in one end and feed it through the waist band.  Be sure not to let the other end of the elastic go inside the "pocket" or you will need to start over or try to "fish it out".  Be careful not to twist the elastic, then overlap the ends and sew together and spread out the gathered fabric evenly.


I look forward to seeing the pretty pink princess dresses that will be covering these poofy things up. Can't wait, can't wait, can't wait!!!!!!!

Family Photos & Crinoline Slips

The rest of our family photos are up over on Danielle Huddleston Photography's blog.  Check them out they are awesome!

This is my favorite!  It is going to be framed and hung on my living room gallery wall.  It is so us.  To get us loosened up and smiling Gabriel started making shadow puppets on the reflector then Jessica joined him in the fun.  I guess we got a little more than smiles.


**************************************************************************************

Other "News"

I'm making crinoline slips for Sweet Lily Girl and Little Miss Ava Grace to go under their princess dresses that my mom is making for their birthdays. (Sew Excited about those.  HaHaHa)  It's a good thing no one will see the slips though because I made a lot of mistakes on the first one.  My communication with my mother was laking and measurements were waaaaaaaaaay wrong.  I had to "make it work" so that I didn't have to start over.  The second one is looking good though.  They are almost finished. Just a few finishing touches when final length is determined.


She was being such a good little model.


And Then....

Me: "Ava Grace will you stand back up please?"
Ava Grace: "No, I poopin"

That's probably one of those things that didn't need to be shared.  But it cracked me up so I thought "why not"


The shoes are a recent hand me down from my friend Raichelle's little one.  Little Miss Ava Grace has been wearing them the majority of the day and part of the night.  They fall off sometime while she is sleeping.  They are 5 sizes to big but she doesn't seem to care.

Tutorial coming later, or tomorrow or sometime soon after that.  Who knows things have been slightly unpredictable these days.  Who am I foolin'. Things around here are always unpredictable.

Sunday, August 14, 2011

Family Pictures Yea!!

We got family pictures taken yesterday.  Bright and early at the Park next to the Gilcrease Museum.  Danielle of Danielle Huddleston Photography took them.  There is a sneak peak up now check it out.  I'm so excited I can't wait to see the rest!

Saturday, August 13, 2011

Diving Back Into The Creative Wave

I have not been doing a lot of "creative" things the past few weeks.  I'm not sure why.  It could be the heat but then again we have air conditioning. (well we did until last week anyway)  So I guess I can't really blame the heat.  For several months now I have been fed up with my boring bathroom.  Gabriel got me a great shower curtain for Christmas but it is the only interesting thing in there.  Several weeks ago I got inspired by said curtain and a couple days ago I actually got motivated. 

Look what I did!

Boring wall before!

After!

Princess To Super Hero

Last Saturday was a party day.  After and early morning photo shoot with Jessica I headed home to get Sweet Lily Girl ready for a Pretty Princess Party.  I gave her an up-do and everything.  (It's so easy with her hair all you need is gel and hair pins.)  The party was fantastic, she is still talking about it.


The Birthday Girl

We all (the moms) had a great time decorating wands and crowns.  The girls loved them.  It was precious.

The party was simple in concept with lots of fun details, good food and fun party games. Perfect for a little princess turning 4.


My favorite part was the Tea Party.  Out under a big shade tree with pretty pink puff balls hanging over head all the little girls sat and drank "tea".  The party mama was clever to fill tea pots with pink lemonade.  As each child headed out to the blankets spread out and waiting for them, they were handed a Jello cup and a baggie which held a spoon, a cheese stick and a heart shaped PB&J sandwich.


And on top of everything else, there was a Pinata.


Sweet Lily Girl hits like a princess.  And of course in true Lily fashion, with her tongue hanging out.


After the Princess Party and a nap we transitioned into super heroes with capes and masks and headed to another party.  I only got a few pictures here but if you'd like to see more including the awesome decorations see Danielle's blog here.   Unfortunately the girls did not leave their masks and capes on long enough for either one of us to get any pictures.  You can see them here though.


The Birthday Boy
We got an appropriate gift for Superman.  A Superman t-shirt of course.

This picture of Sweet Lily Girl is well, sweet.  I'm not sure if this is a sign of exhaustion from the day or just peacefully enjoying the party of one of her best little friends.  Either way, I think she pretty with her left over princess hair and sweet look.


Bat Man left his mask on for the majority of the party.  It was adorable.


You can see how daintily Little Miss Ava Grace eats over here.  I however will post a clean picture of her just because it's so stinkin' cute. This is the look she gets when she know she's getting something that does not belong to her.  Like a Superman bottle for example.


The girls had so much fun.  But how could they not have a great time when they are with their bestest friends and get to eat cake and ice cream.

Tuesday, August 9, 2011

I'm A Fan Of Infatuation but I Choose Love!

I Choose Love.
I Choose You.


I like this picture of Gabriel so much I'm not even sure what to say about it.  It's so him, just relaxed looking at me.  I'm going to frame it and put it in my house somewhere.

I am so grateful for the way he loves me.  The sacrifices he makes.  The things he chooses to do just because I would enjoy it.  If relationships could have a motto ours would be "Choose Love".  It is inscribed on the inside of his wedding band.  It would be inscribed in mine if it was big enough. 

I am a BIG fan of infatuation.  It's fun to have all those mushy feelings, passion and excitement practically oozing out of you.  However we thankfully learned before we got married that the oozing eventually slows down.  Some days will have more passion some days less. Life happens but so can love, real love.  The kind that is chosen on a daily basis.  The kind that is patient and kind and not jealous or boastful or proud or rude. The love that does not demand its own way and is not irritable, and keeps no record of being wronged. The kind that does not rejoice about injustice but rejoices whenever the truth wins out. The kind of love that never gives up, never loses faith, is always hopeful, and endures through every circumstance.  (Taken and adapted from the Bible, I Corintians 13) We still have a long way to go with perfecting this "Real Love" but we have also come a long way. Sometimes I think Gabriel has come farther than I have, especially those times I feel that I fall short.  I am thankful every moment is an opportunity for change.

Apparently I'm feeling a little serious today.  Maybe someone out there needs this today.  Maybe the someone was just me.

Monday, August 8, 2011

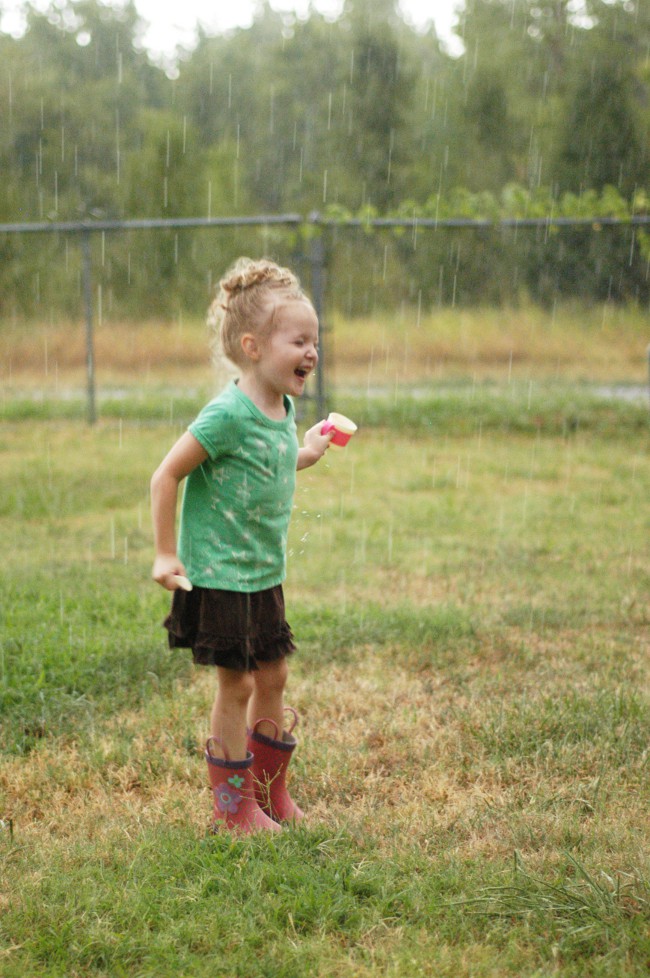
It Rained!!!!!!!!!!!!!

We are so grateful for rain.  Saturday, on the way home from our second birthday party of the day, dark clouds rolled in, thunder clapped, lightning struck and yes we actually got rain.  It was wonderful.  Yes it was a thunderstorm and yes I do know there are certain dangers about going out but sometimes you throw caution to the wind and run out in the rain anyway.  (We were actually under the patio roof the majority of the time anyway.)


.


Getting cold, time to head in.


Sunday, August 7, 2011

Cranky to Thankful

As I sit here at my computer the temperature in my house is rising.  My air is not working properly and needed to be turned off.  Last time I looked it was 87 degrees in here.  I don't want to look again.  Here in Tulsa we have been setting records.  Staying above average for heat and below average for rain.  I'm feeling cranky.  I don't want to hear anymore about it.  I'm feeling cranky.  I want to sit in front of my fan and not move, and please don't anyone touch me.

Then I look at my girls still playing overall pretty happy.  And as I go through pictures sorting what I might still want to edit from our vacation and the time my mom was here I found these:


I'm done being cranky.  We are going outside and we are going to make the best of today.  And we are going to be thankful we have been given another day.